Injection Mold Tooling: Types, Costs, Lead Times & How to Choose
- Key Takeaways
- What is Injection Mold Tooling?
- Parts of an Injection Mold
- Types of Injection Mold Tooling
- Tool Materials
- Tool Configuration
- What Drives Injection Mold Tooling Costs
- How to Reduce Injection Mold Tooling Cost
- Injection Mold Tooling Lead Times
- Who Owns the Mold? Tooling Ownership and Transfer
- How Komaspec Supports Your Injection Mold Tooling
- FAQs
Injection mold tooling is the custom-built, hardened metal mold that gives an injection molded part its shape. It incorporates runners, cooling lines, ejection systems and a number of other in-built components that combine to produce the desired production part.
The tool is often the largest upfront cost for a molding program, and is also what takes longest on the project schedule. In this article, we’ll talk through a number of important aspects of injection mold tooling, including how molds are classified, what influences pricing, how long a build can take and who owns the tool once it’s actually made.
Key Takeaways
Production volume is the main decider of the tool class. Injection molds are classified according to the SPI classification, which runs from Class 105 prototype tools rated for a few hundred shots, right up to Class 101 tools that can handle over a million.
Price is driven heavily by the cavity count and side actions. On simpler parts, each additional cavity adds 15% to 30% to tool cost. On molds with side actions or complex structures the increase passes 50%, and scales with overall part size.
The resin and the finish will direct the choice of steel used. Pre-hardened P20 family grades cover a lot of general-purpose work, but plenty of builders specify stainless grades such as S136 as their default, for the corrosion resistance and polish quality rather than because the resin demands it.
Lead times are usually between 45 to 65 days. First samples for small, low-cavity molds can be ready in around five weeks.
Tool ownership belongs in the purchase order. Who holds title, and who is responsible for maintenance and storage, should be explicit before the tool is built.
Table of Contents
- Key Takeaways
- What is Injection Mold Tooling?
- Parts of an Injection Mold
- Types of Injection Mold Tooling
- Tool Materials
- Tool Configuration
- What Drives Injection Mold Tooling Costs
- How to Reduce Injection Mold Tooling Cost
- Injection Mold Tooling Lead Times
- Who Owns the Mold? Tooling Ownership and Transfer
- How Komaspec Supports Your Injection Mold Tooling
- FAQs
What is Injection Mold Tooling?
Injection mold tooling is the metal assembly that forms the foundation of the plastic injection molding process, and is custom made to specific requirements.
The tool is built for one finalized production part and is a large upfront cost, and it sets the ceiling on everything that follows. Once finalized and made, the mold then controls the limitations of what the production can output. Any changes to the mold can be costly and slow, and can even result in starting from scratch with the tooling stage.
Parts of an Injection Mold
The production mold is an assembly of components, and each part has an important job.
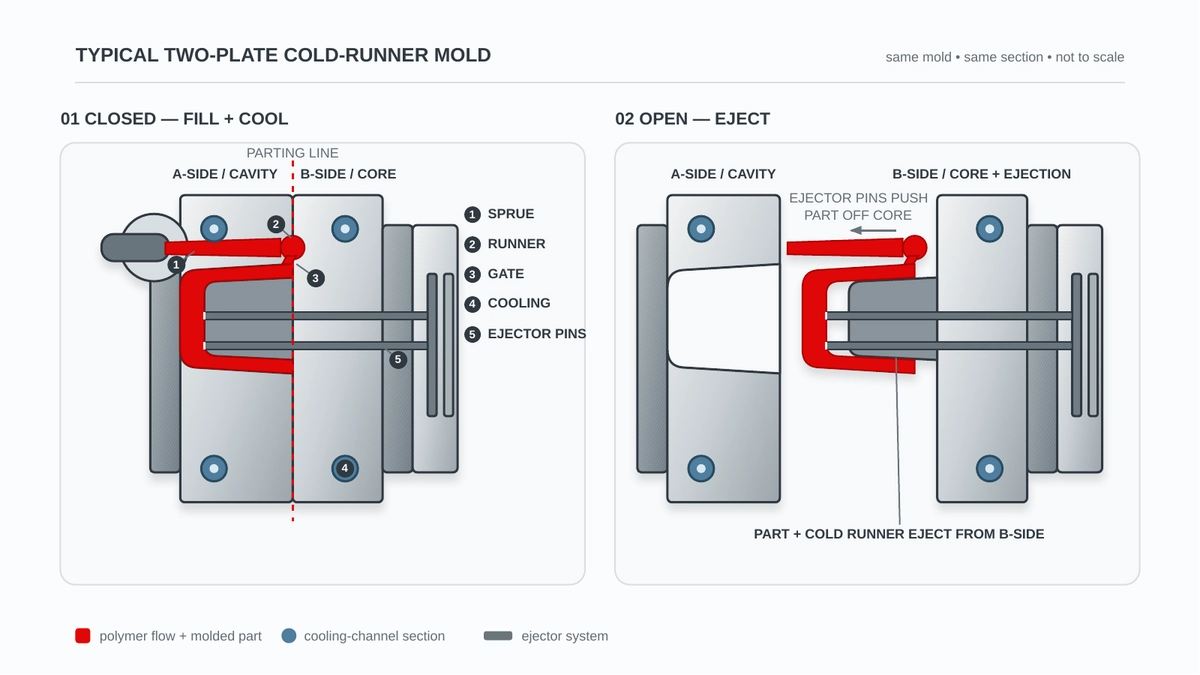
The mold base is the steel frame that holds everything else, and is composed of two plates that align to support the cavity and core inserts. The cavity and core are the two halves that, together, form the mold with the cavity shaping the outer surface, while the core forms the internal surface.
The runner and gate are the channels that guide the molten material into the cavity. Specifically, the runner is the main path that carries the injection material and the gate is the entry point into the final molded part.
Cooling lines are internal channels that help to set cycle time and also influence any warpage, as they circulate coolant that helps draw out the heat from the molten plastic in a controlled, consistent way. And the ejector system is made up of pins and plates that push the solidified part off the core once the mold opens.
Slides and lifters are another mechanical aspect that play an important part in ejection, as they enable undercuts to eject smoothly.
Types of Injection Mold Tooling
A number of decisions influence what type of injection mold tooling configuration is used.
How long the mold needs to last is a key one, and the SPI classification was developed as a common language for quoting molds. Classes 102, 103 and 104 cover the majority of tools built today.
| Class | Rated cycles | Construction | Best fit |
|---|---|---|---|
| 101 | Over 1,000,000 | Cavities and cores from 48 HRC, structure from 28 HRC | High volume, abrasive resins |
| 102 | Up to 1,000,000 | Hardened cores and cavities, fewer options than 101 | Medium to high volume, close tolerance |
| 103 | Under 500,000 | Mold base from 165 BHN, cores and cavities from 280 BHN | The most common production tool |
| 104 | Under 100,000 | Mild steel or aluminum base and cavities | Low volume, non-abrasive resins |
| 105 | Under 500 | Aluminum, cast metal, epoxy | Prototype and design validation |
Tool Materials
Aluminum’s cost is roughly 50% lower than steel, but this applies only to the material and not the finished tool because machining, polishing and assembly labor are what dominate the finished tool costs. Aluminum is typically selected for its speed to first parts.
Steel such as H13 holds up far better, with high thermal fatigue and cracking resistance, plus high toughness and impact resistance. It can produce molds with complex geometries and high-gloss polished surfaces, but is not without its own drawbacks such as moderate corrosion resistance and relatively high material cost.
| Material | Typical hardness | Typical applications |
|---|---|---|
| Aluminum | - | Prototype and bridge tooling, with maximum production volume of 1,000 to 3,000 shots |
| P20 | 28 to 34 HRC | General purpose molds and non-corrosive resins |
| 718, 718H, 738, 738H | 30 to 38 HRC | Larger molds requiring through-hardening and polish |
| NAK80 | 37 to 43 HRC | High polish without separate hardening step |
| S136, S136H | 45 to 52 HRC | Corrosion resistance, mirror finishes, off-gassing resins |
| H13 | 45 to 55 HRC | High-volume molds and demanding thermal cycling |
Resin choice and steel choice are directly linked, and it is easier to settle the resin first. See our plastic injection material options page covers the grades.
Tool Configuration
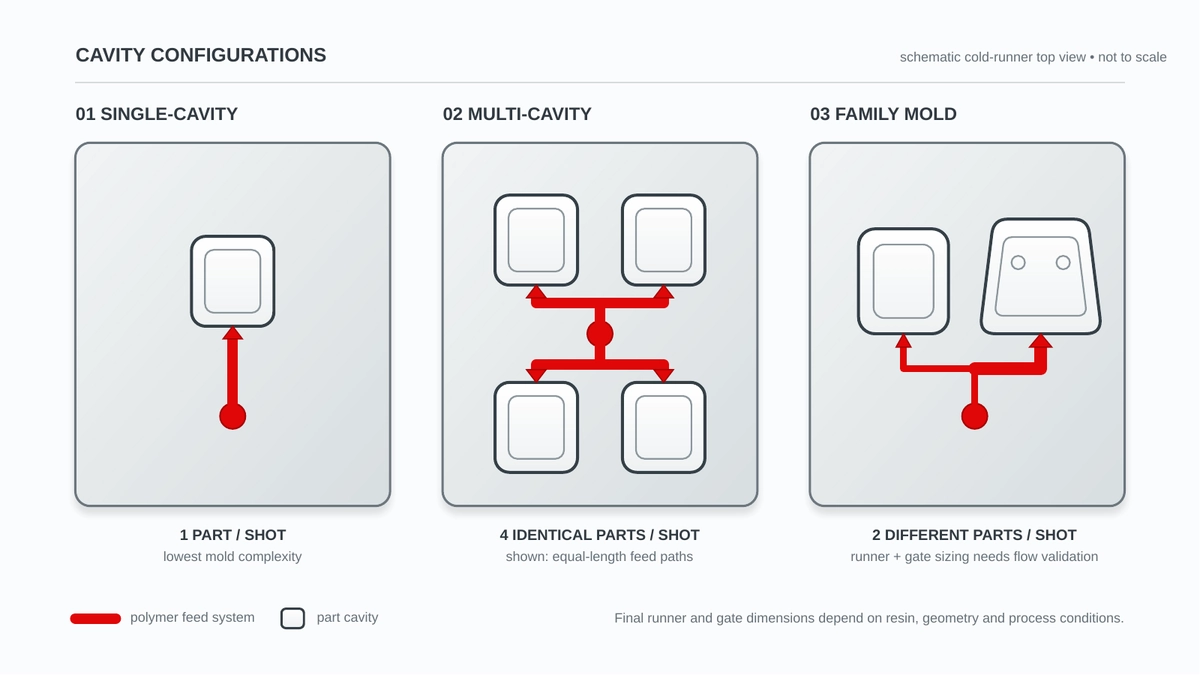
There are a number of configurations to the tool that have an impact, with cavitation being one of the biggest. A single cavity results in a cheap tool cost but a higher cost per part, while multi-cavity tools are inverse in that they have higher tooling costs but a lower cost per part.
Family tooling brings together multiple cavities in one mold to cover off different parts of the same assembly and can be cost effective, but it also creates difficulties with material flow and distribution. Cold and hot runners are another area that offer benefits and drawbacks: cold runners are lower cost but produce waste with each shot, while hot runners cost more to produce and maintain but don’t create wastage and have faster cycles.
The aforementioned slides and lifters are necessary for complex molds but add cost, and then there are insert or overmolding scenarios which require a two-shot tool. See our comparison of insert molding and overmolding for more.
What Drives Injection Mold Tooling Costs
Quotes for the same tooling part can vary drastically between suppliers due to different assumptions about class, cavitation, material and finishes, and this is where a full DFM review comes into its own. Some of the key cost drivers:
| Cost driver | Impact on tool cost |
|---|---|
| Cavity count | 15% to 30% per added cavity on simpler parts |
| Side action slider | 10% to 40% of total mold cost each |
| Side actions plus complex structure | Cavity increases pass 50%, exact cost varies based on overall product size |
| Part size | Bigger steel and larger bases |
| Steel grade | Affects material cost and machining time, but labor dominates the total |
| Hot runner system | Higher tool cost, but offset against saving on scrap and cycle time |
The question underneath all of this is whether the tool pays for itself. Landed cost per part is the tool cost divided by the annual volume, plus the per-part price. A tool amortized over 5,000 parts a year carries a heavy per-part burden; the same tool over 200,000 parts is close to a rounding error. That calculation, run against CNC machining or 3D printing quotes at the same volume, is what tells you whether to cut steel at all.
How to Reduce Injection Mold Tooling Cost
Most of the savings available on a tool are found before steel is cut, in the part geometry itself.
Designing out a side action is the single biggest lever. Each slider mechanism carries 10% to 40% of total mold cost, so a geometry change that lets a feature eject on the parting line - moving a snap-fit, adding a through-hole above an undercut, splitting a feature across two parts - can pay for the design review several times over.
Matching cavitation to real annual volume is the second. Cavity count is quoted against forecasts, and forecasts are optimistic. A four-cavity tool built for a volume that never arrives is money spent on capacity that sits idle, and it cannot be given back.
Beyond that: uniform wall thickness and generous draft reduce the finishing work and the number of sampling iterations. Family tooling can consolidate related parts into one base, though it constrains flow balance. And a resin decision made before the tool is designed avoids the most expensive revision of all, since cavity dimensions are cut to compensate for that resin’s shrinkage rate.
Injection Mold Tooling Lead Times
Normal injection mold tooling lead times are from 45 to 65 days, from order to first sample shots off the new tool, which are referred to as T0. Build quotes typically run to T0, with T1 then being the first formally submitted sample round.
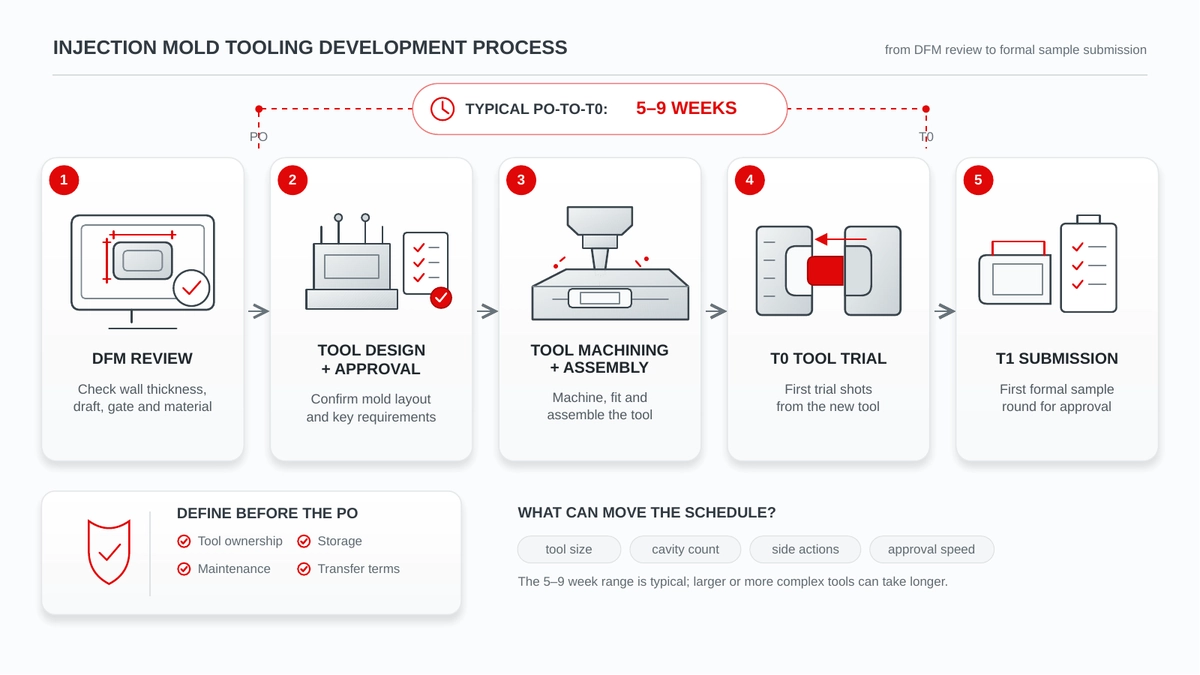
To give an idea of how the variables involved interact, these are three recent examples of molds produced by Komaspec:
| Part | Size (mm) | Cavities | Tool steel | Lead time to T0 |
|---|---|---|---|---|
| Small ABS component | 43 x 25 x 15 | 4 (2+2) | S136 | 5 weeks |
| Medium ABS component | 220 x 123 x 71 | 1 | S136 | 6 weeks |
| Medium ABS component | 380 x 310 x 95 | 1 | S136H | 8 to 9 weeks |
Who Owns the Mold? Tooling Ownership and Transfer
When a customer pays for a tool, they normally then have ownership of it, but it is always advisable to have the ownership status stated explicitly in writing. A supplier-funded mold means the supplier owns it, and there are scenarios where there is shared ownership between the two parties.
Before the PO is issued, a buyer should also always ensure they have, in writing, transfer conditions, clear processes for what happens if they change supplier, the location of the tool’s storage, and who is responsible for its maintenance. Molds are usually stored at the molder’s production facility, with maintenance folded into the overall agreement.
At Komaspec, ownership is agreed on a per-project basis, depending on how the tool is funded.
How Komaspec Supports Your Injection Mold Tooling
If you’re bringing a plastic part to market, send us your part files for a DFM review and tooling assessment.
FAQs
What is injection mold tooling made of?
The mold base is typically a lower-grade steel than the cavity and core inserts, which take the wear and require harder steel grades. Aluminum is sometimes also used, but mostly for prototyping and bridge tooling.
How long does injection mold tooling take to make?
A normal build runs from 45 to 65 days for the first mold samples to be ready, but larger and more complex parts can take longer. Small tools with lower cavity counts can be turned around in as little as five weeks. It’s worth remembering that customer approval time is part of that timeline, and can influence it substantially.
How much does injection mold tooling cost?
Cost is driven by cavity count, part size, steel grade, moving actions and surface finish. Relative impact is a better steer than a headline figure, because the range is so wide. For each added cavity, you’re looking at an addition of between 15% to 30% to total mold cost on a simpler part, and 10% to 40% for each slider.
Why do injection mold tooling quotes vary so much between suppliers?
This is usually down to the fact that suppliers are quoting different tools, and mold class, cavity count, steel grade and surface finish are all price movers that can vary substantially based on a mold’s design.
Can an existing injection mold be modified?
It can, but it depends on how complex and difficult the modification is. Steel grade is important here too, because a grade such as H13 has poor weldability, which matters a great deal if alterations are needed later.
What is the difference between a prototype tool and a production tool?
Expected lifespan is the quick answer, with the tool’s projected usage impacting what it’s actually built to withstand. Prototype tools tend to be made from aluminum or soft steel and limited to the number of shots they can take. Production tools are hardened steel set up for repeat cycles and higher tolerances, with consistent finishes across long runs.